# 물리

## 개요

Anchored 프로퍼티를 통해 Part가 물리적 영향을 받을 수 있도록 설정할 수 있습니다. 또한, LinearVelocity나 AngularVelocity와 같은 물리 기반 오브젝트를 사용하면 Part의 물리적인 이동과 회전 동작을 보다 세밀하게 제어할 수 있습니다.

## 물리 고정 해제

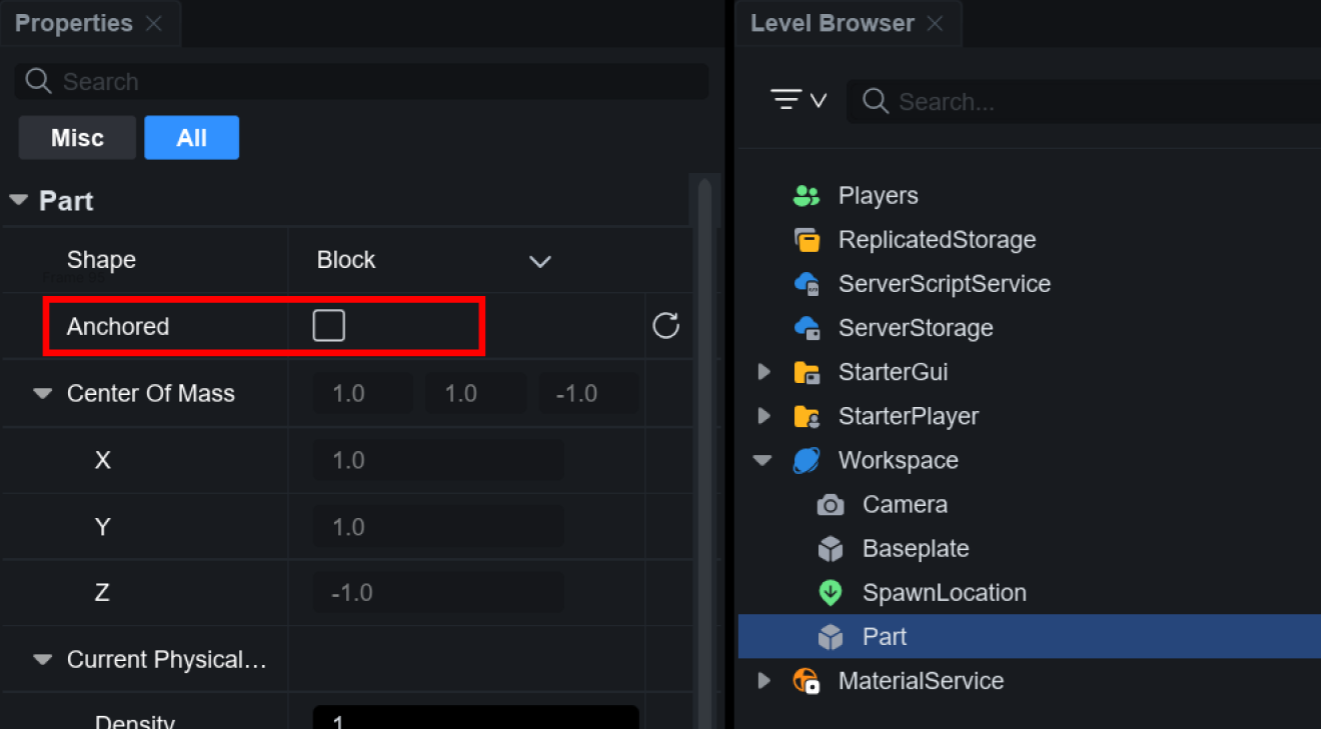
OVERDARE Studio에서는 **Anchored** 속성을 사용하여 오브젝트의 물리 고정 여부를 설정할 수 있습니다. 기본적으로 새롭게 추가된 Part의 물리는 성능 최적화를 위해 **비활성화 상태**로 설정되어 있습니다.

물리 효과를 적용하려면 Part를 선택한 후, **Anchored** 속성을 비활성화하세요.

<figure><img src="/files/wxEiBBqNLe4IuDZ7nwGo" alt=""><figcaption></figcaption></figure>

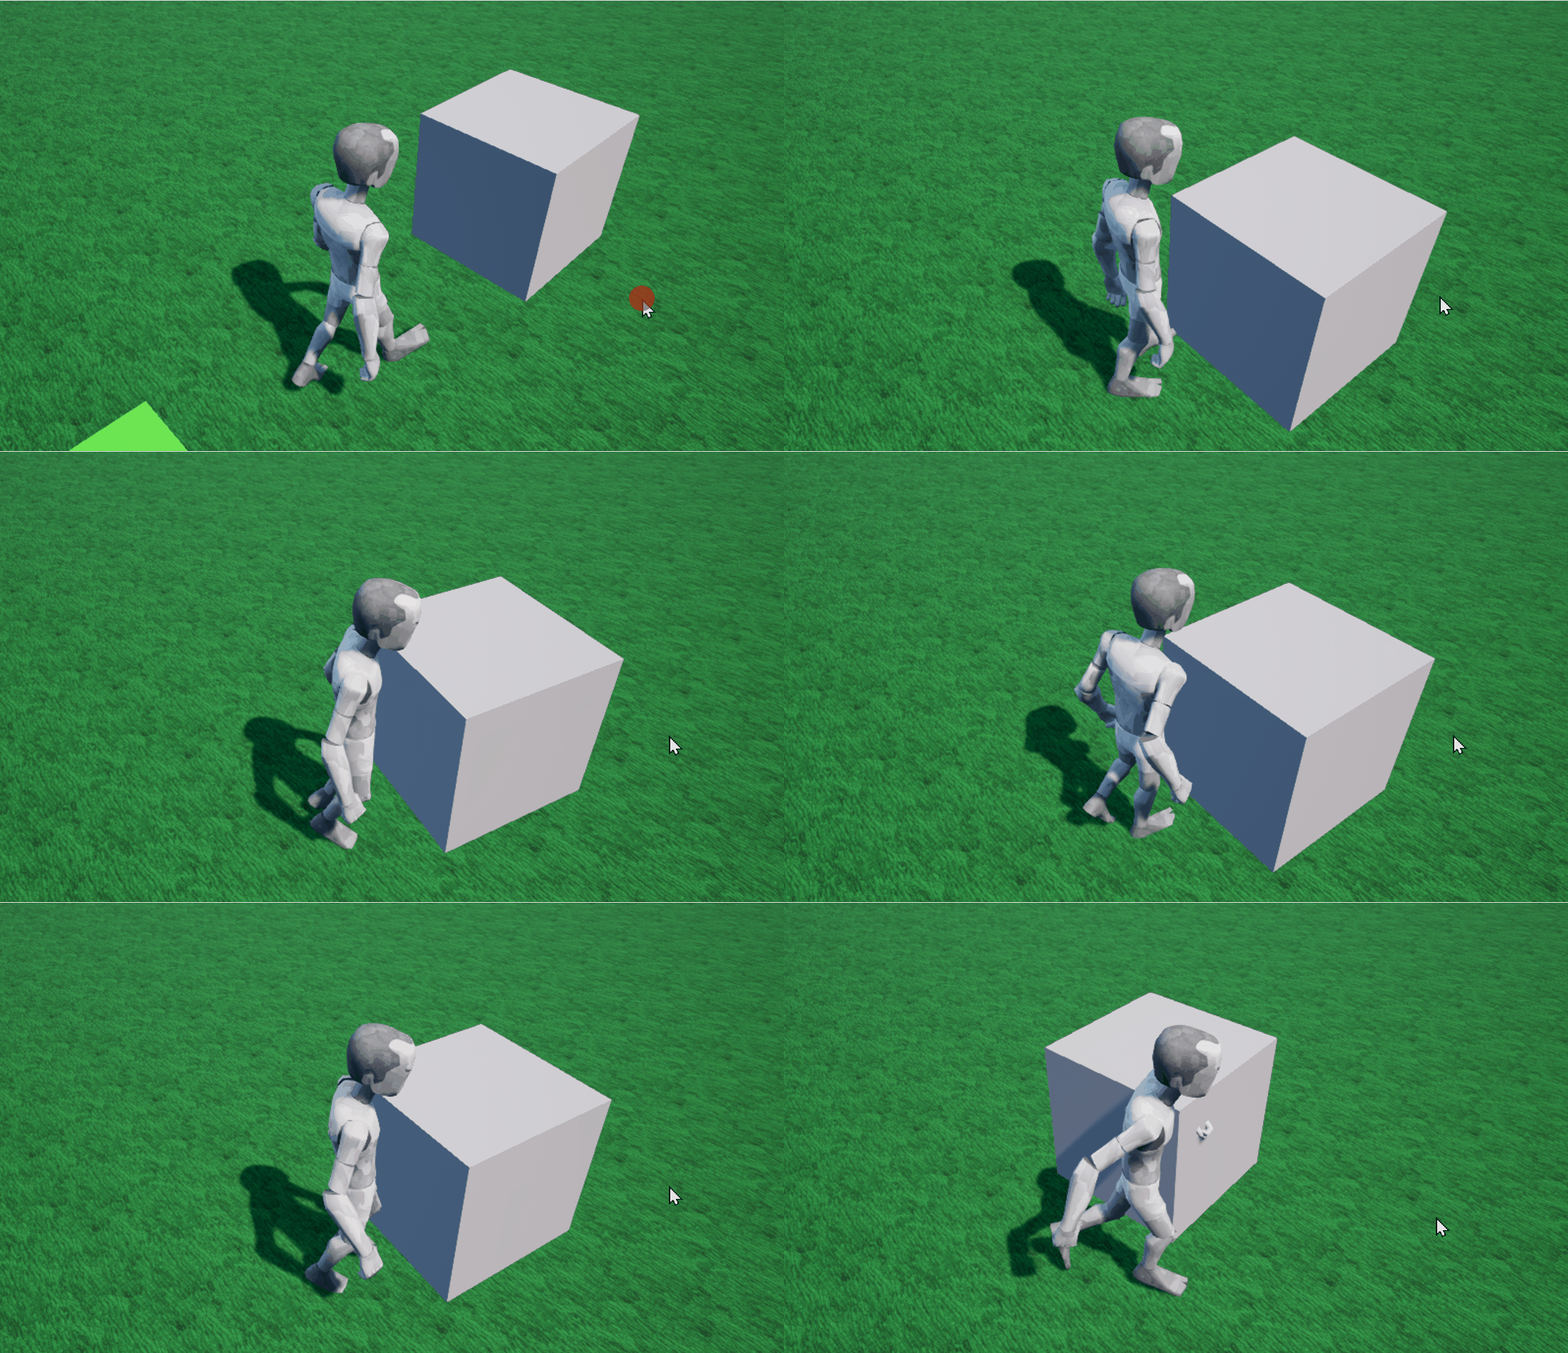
Anchored 속성이 비활성화된 오브젝트는 물리적인 힘과 중력의 영향을 받게 됩니다.

<figure><img src="/files/S6UMaaAZK0n3kxoYc8el" alt=""><figcaption></figcaption></figure>

## LinearVelocity

**LinearVelocity**는 오브젝트에 일정한 직선 속도를 적용하는 물리 오브젝트입니다. 이를 사용하면 중력이나 충돌과 같은 외부 힘의 영향을 받더라도 일정한 방향으로 지속적으로 이동할 수 있습니다.

### 사용 방법

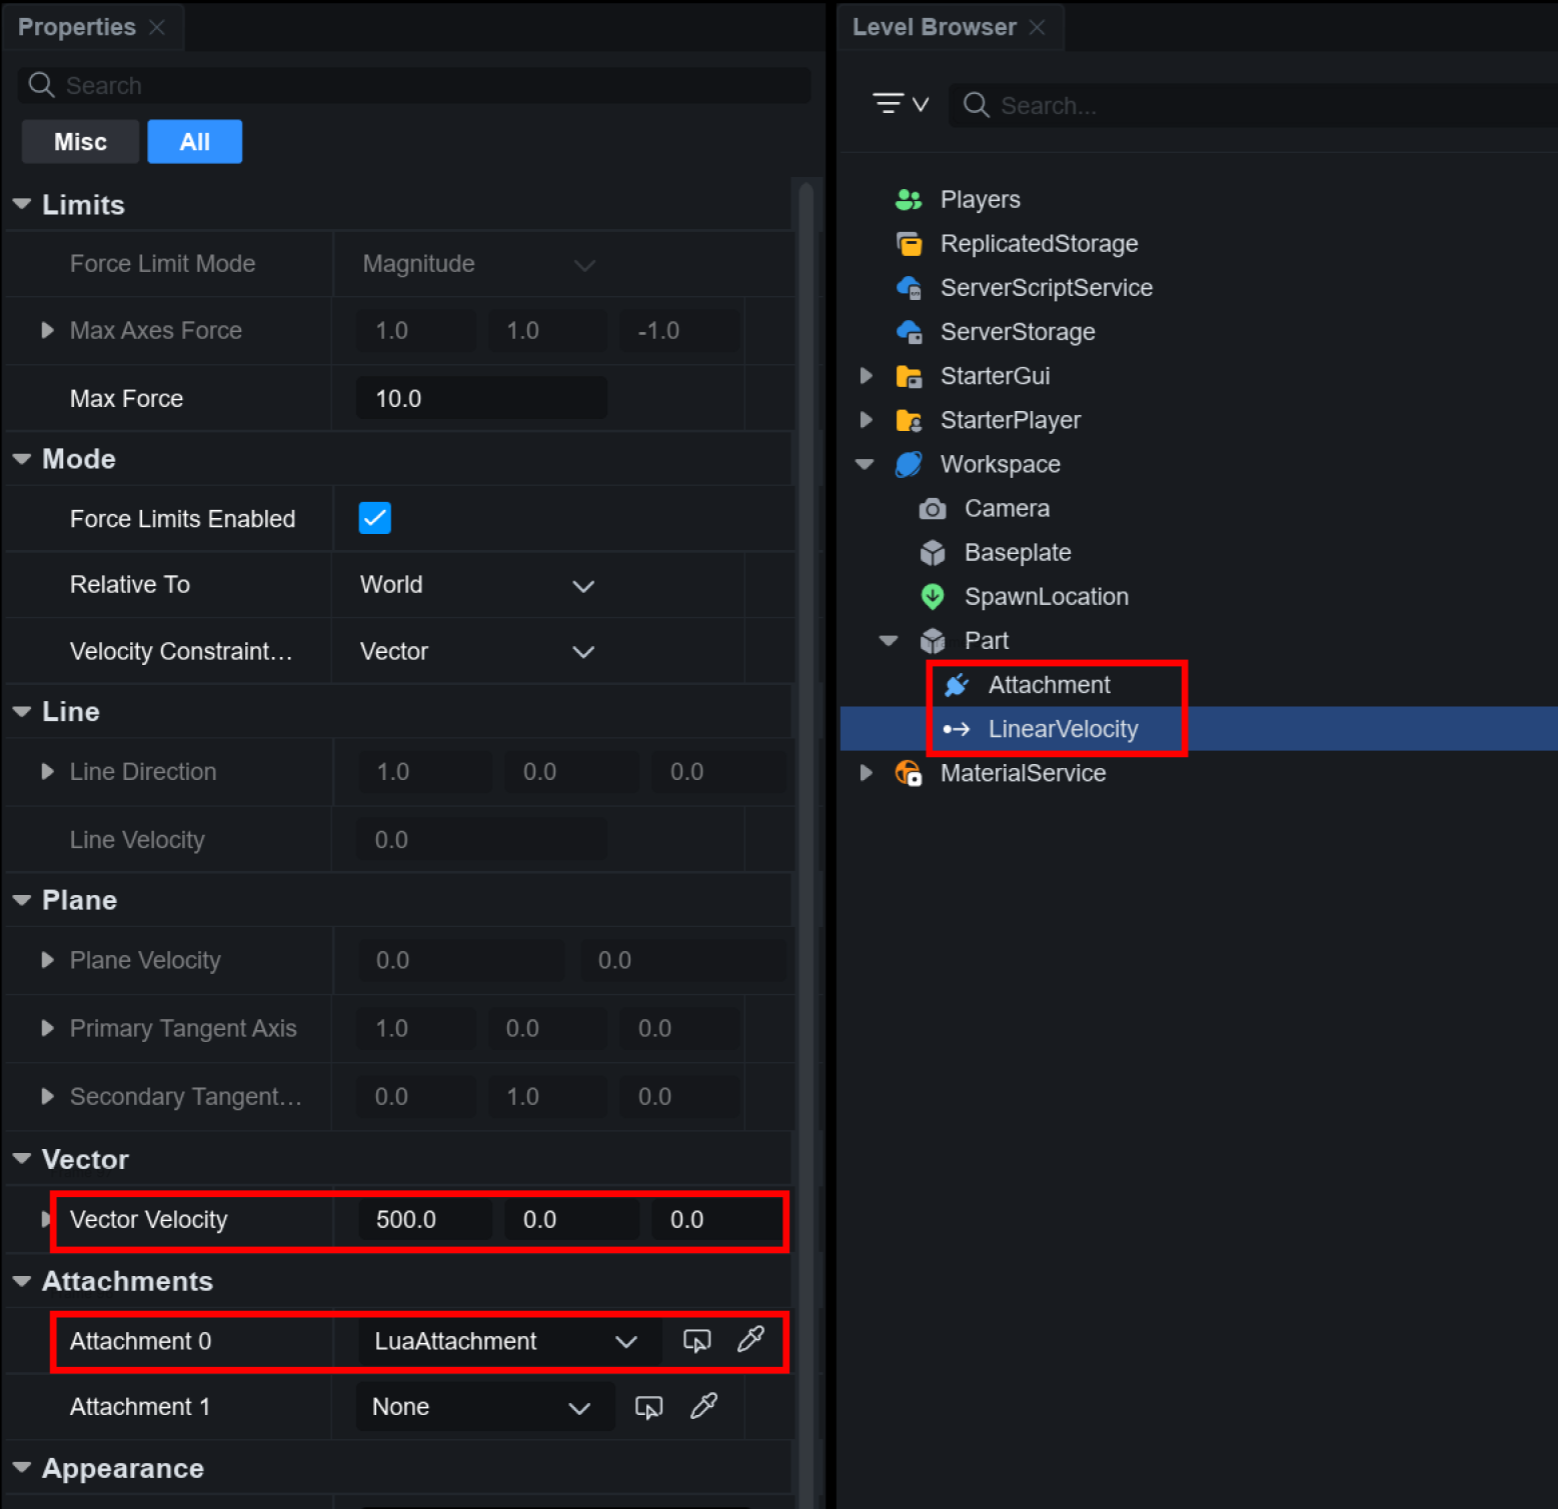
LinearVelocity를 사용하려면 Part에 **Attachment**가 있어야 합니다. 먼저 Part에 Attachment를 추가한 후, LinearVelocity의 프로퍼티 창에서 해당 Attachment를 설정합니다. 이후, **Vector Velocity** 속성에서 적용할 물리적 힘(이동 방향)을 지정하면, Part가 해당 방향으로 이동합니다.

<figure><img src="/files/3xbOQiNEDkk479ag54eJ" alt=""><figcaption></figcaption></figure>

만약 물리 효과가 적용되지 않는다면 Part의 **Anchored** 속성이 **비활성화**되어 있는지 확인해보세요!

### 프로퍼티 구성

<table><thead><tr><th width="212">프로퍼티</th><th>설명</th></tr></thead><tbody><tr><td>Force Limit Mode</td><td><p>적용되는 힘의 제한 방식을 설정하는 속성입니다.</p><ul><li>Magnitude: 전체 벡터 크기에 대한 힘 제한 적용</li><li>PerAxis: X, Y, Z 축별로 개별적인 힘 제한 설정 가능</li></ul></td></tr><tr><td>Max Axes Force</td><td>Force Limit Mode가 "PerAxis"일 때, 각 축(X, Y, Z)별로 적용할 수 있는 최대 힘을 설정합니다.</td></tr><tr><td>Max Force</td><td>Force Limit Mode가 "Magnitude"일 때, LinearVelocity가 적용할 수 있는 최대 힘(뉴턴 단위)을 설정합니다.</td></tr><tr><td>Force Limits Enabled</td><td><p>Max Axes Force 또는 Max Force 제한을 활성화할지 여부를 설정합니다.</p><ul><li>true: 설정한 최대 힘 제한을 적용</li><li>false: 힘 제한 없이 적용 (기본값)</li></ul></td></tr><tr><td>Relative To</td><td><p>속도가 적용되는 기준 좌표계를 설정하는 속성입니다.</p><ul><li>Attachment 0: 첫 번째 부착점(Attachment0)을 기준으로 속도 적용</li><li>Attachment 1: 두 번째 부착점(Attachment1)을 기준으로 속도 적용</li><li>World: 월드 좌표 기준으로 속도 적용</li></ul></td></tr><tr><td>Velocity Constraint Mode</td><td><p>속도가 적용되는 방식을 결정합니다.</p><ul><li>Vector: 특정 벡터 속도를 직접 설정 (기본 설정)</li><li>Line: 특정 선(라인) 방향으로 속도 설정</li><li>Plane: 특정 평면 내에서만 속도 설정</li></ul></td></tr><tr><td>Line Direction</td><td>Velocity Constraint Mode가 Line일 때, 적용할 선형 방향을 결정하는 벡터입니다.</td></tr><tr><td>Line Velocity</td><td>Velocity Constraint Mode가 Line일 때, 선형 방향으로 적용할 속도의 크기를 설정합니다.</td></tr><tr><td>Plane Velocity</td><td>Velocity Constraint Mode가 Plane일 때, 평면 내에서 속도를 설정합니다.</td></tr><tr><td>Primary Tangent Axis</td><td>Velocity Constraint Mode가 Plane일 때, 기본 접선 축을 설정합니다. 이 축을 기준으로 평면 내 이동 방향이 결정됩니다.</td></tr><tr><td>Secondary Tangent Axis</td><td>Velocity Constraint Mode가 Plane일 때, 보조 접선 축을 설정합니다. Primary Tangent Axis와 수직한 방향으로 설정해야 합니다.</td></tr><tr><td>Vector Velocity</td><td>Velocity Constraint Mode가 Vector일 때, 오브젝트에 적용할 속도를 나타내는 벡터입니다.</td></tr><tr><td>Attachment 0</td><td>LinearVelocity가 적용될 부착점을 설정합니다.</td></tr><tr><td>Attachment 1</td><td>LinearVelocity가 적용될 부착점을 설정합니다.</td></tr></tbody></table>

### 스크립트 기능

```lua
local Part = script.Parent
Part.Anchored = false

local Attachment = Instance.new("Attachment")
Attachment.Parent = Part

local LinearVelocity = Instance.new("LinearVelocity")
LinearVelocity.Attachment0 = Attachment
LinearVelocity.RelativeTo = Enum.ActuatorRelativeTo.World 
LinearVelocity.VectorVelocity = Vector3.new(1000, 0, 0) 
LinearVelocity.MaxForce = 10
LinearVelocity.Parent = Part
```

## VectorForce

VectorForce는 오브젝트에 지속적으로 힘과 가속도를 적용하는 물리 객체입니다. 이를 사용하면 오브젝트의 속도를 서서히 변화시키며 자연스러운 움직임을 만들 수 있습니다.

### 사용 방법

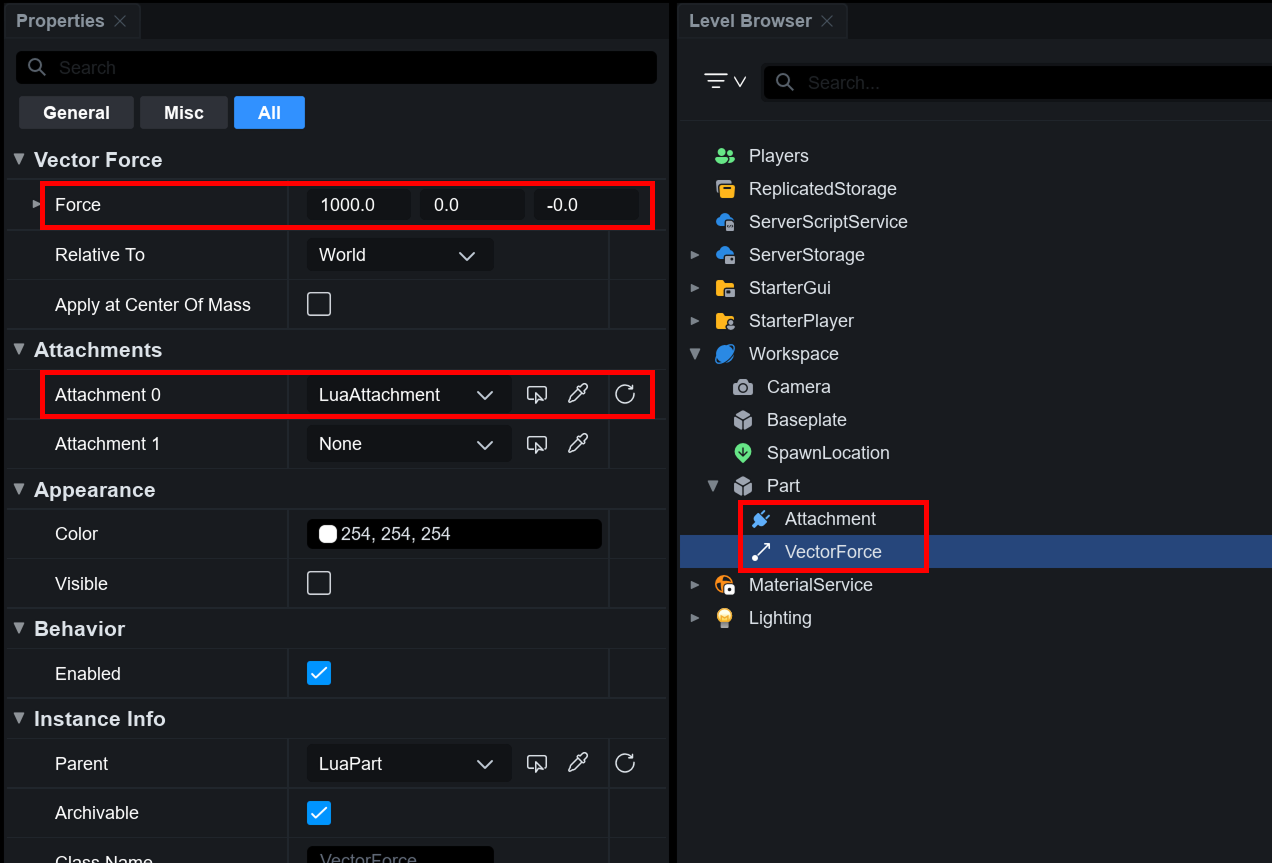
VectorForce를 사용하려면 Part에 **Attachment**가 있어야 합니다. 먼저 Part에 Attachment를 추가한 후, VectorForce의 프로퍼티 창에서 해당 Attachment를 설정합니다. 이후, **Force** 속성에서 적용할 물리적 힘(이동 방향)을 지정하면, Part가 해당 방향으로 이동합니다.

<figure><img src="/files/FYK1liNUz5CLVs8FHMZo" alt=""><figcaption></figcaption></figure>

만약 물리 효과가 적용되지 않는다면 Part의 **Anchored** 속성이 **비활성화**되어 있는지 확인해보세요!

### 프로퍼티 구성

<table><thead><tr><th width="212">프로퍼티</th><th>설명</th></tr></thead><tbody><tr><td>Force</td><td>힘의 크기와 방향을 설정할 수 있습니다.</td></tr><tr><td>Apply at Center of Mass</td><td><p>힘이 어디에 작용할지를 설정할 수 있습니다.</p><p>이 속성을 비활성화하면 힘은 물체의 중심(질량 중심)에 적용됩니다. 반대로 활성화하면 힘은 Attachment0이 있는 위치에 가해지며, 이 위치가 중심이 아닌 경우 회전이 함께 발생할 수 있습니다.</p></td></tr><tr><td>Relative To</td><td><p>힘이 적용되는 기준 좌표계를 설정할 수 있습니다.</p><ul><li>Attachment 0: 첫 번째 부착점(Attachment0)을 기준으로 속도 적용</li><li>Attachment 1: 두 번째 부착점(Attachment1)을 기준으로 속도 적용</li><li>World: 월드 좌표 기준으로 속도 적용</li></ul></td></tr><tr><td>Attachment 0</td><td>VectorForce가 적용될 부착점을 설정하는 속성입니다.</td></tr><tr><td>Attachment 1</td><td>VectorForce가 적용될 부착점을 설정하는 속성입니다.</td></tr></tbody></table>

### 스크립트 기능

```lua
local Part = script.Parent
Part.Anchored = false

local Attachment = Instance.new("Attachment")
Attachment.Parent = Part

local VectorForce = Instance.new("VectorForce")
VectorForce.Attachment0 = Attachment
VectorForce.RelativeTo = Enum.ActuatorRelativeTo.World 
VectorForce.Force = Vector3.new(500000, 0, 0) 
VectorForce.Parent = Part
```

## AngularVelocity

**AngularVelocity**는 오브젝트에 회전 속도를 적용하는 물리 오브젝트입니다. 이를 사용하면 오브젝트를 일정한 속도로 회전시킬 수 있습니다.

### 사용 방법

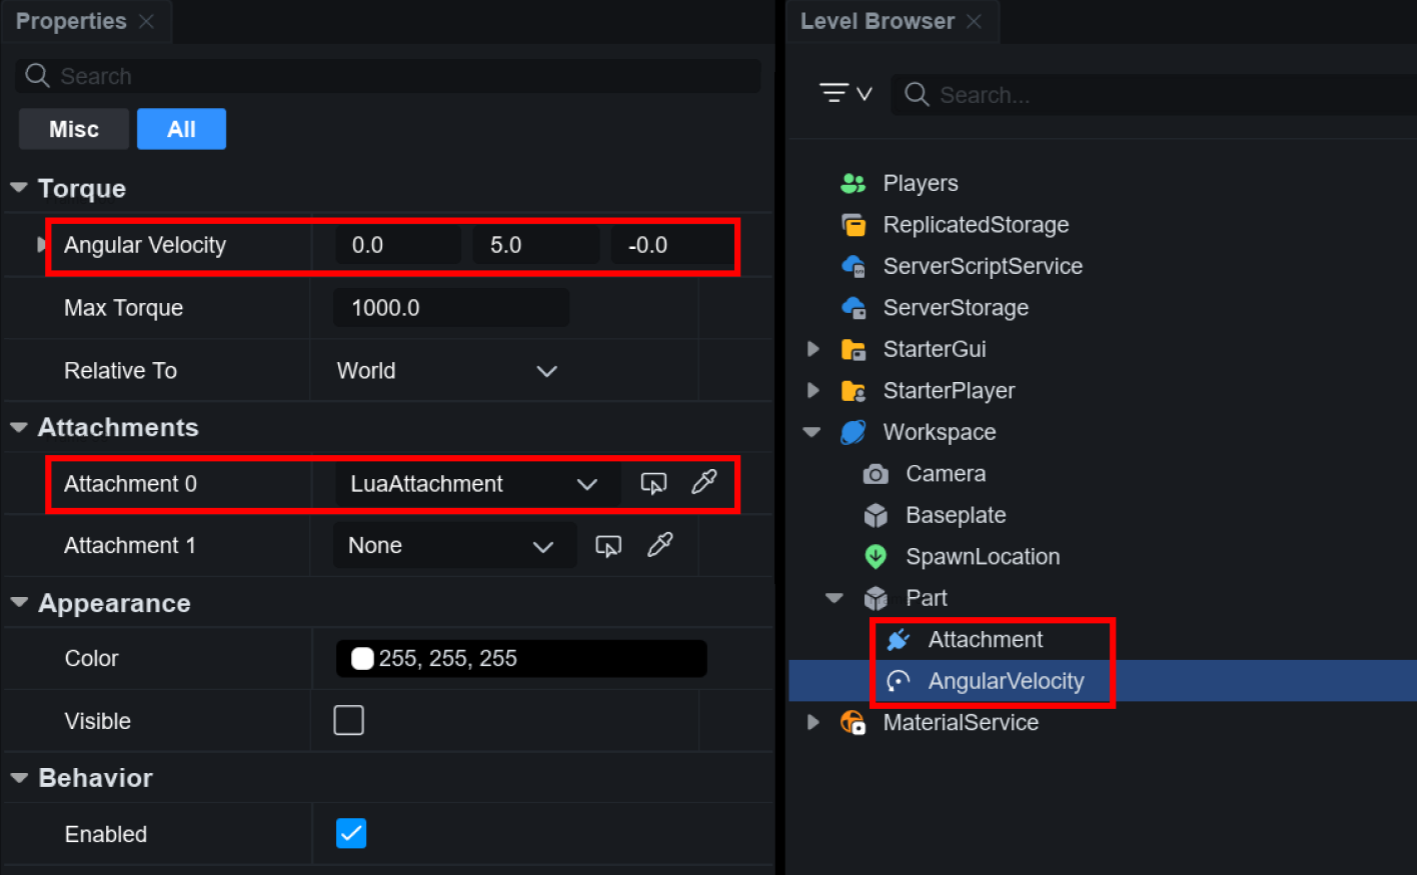
AngularVelocity를 사용하려면 Part에 **Attachment**가 있어야 합니다. 먼저 Part에 Attachment를 추가한 후, AngularVelocity의 프로퍼티 창에서 해당 Attachment를 설정합니다. 이후, **Angular Velocity** 속성에서 적용할 물리적 힘(회전 방향)을 지정하면, Part가 해당 방향으로 회전합니다.

<figure><img src="/files/vWCAFoFc4sRoaDz6FUd9" alt=""><figcaption></figcaption></figure>

만약 물리 효과가 적용되지 않는다면 Part의 **Anchored** 속성이 **비활성화**되어 있는지 확인해보세요!

### 프로퍼티 구성

<table><thead><tr><th width="212">프로퍼티</th><th>설명</th></tr></thead><tbody><tr><td>Angular Velocity</td><td>오브젝트에 적용할 회전 속도를 나타내는 벡터입니다.<br>(X, Y, Z 축 각각에 대한 회전 속도를 라디안/초 (rad/s) 단위로 설정할 수 있습니다.)</td></tr><tr><td>Max Torque</td><td>오브젝트에 적용할 수 있는 최대 회전 힘(토크)을 설정하는 값입니다.<br>(이 값이 작으면 회전 속도가 원하는 값에 도달하지 못할 수 있습니다.)</td></tr><tr><td>Relative To</td><td><p>회전 속도가 적용되는 기준 좌표계를 설정하는 속성입니다.</p><ul><li>Attachment 0: 첫 번째 부착점(Attachment0)을 기준으로 회전 적용</li><li>Attachment 1: 두 번째 부착점(Attachment1)을 기준으로 회전 적용</li><li>World: 월드 좌표 기준으로 회전 적용</li></ul></td></tr><tr><td>Attachment 0</td><td>AngularVelocity가 적용될 부착점을 설정하는 속성입니다.</td></tr><tr><td>Attachment 1</td><td>AngularVelocity가 적용될 부착점을 설정하는 속성입니다.</td></tr></tbody></table>

### 스크립트 기능

```lua
local Part = script.Parent
Part.Anchored = false

local Attachment = Instance.new("Attachment")
Attachment.Parent = Part

local AngularVelocity = Instance.new("AngularVelocity")
AngularVelocity.Attachment0 = Attachment
AngularVelocity.AngularVelocity = Vector3.new(0, 3, 0) 
AngularVelocity.MaxTorque = math.huge 
AngularVelocity.RelativeTo = Enum.ActuatorRelativeTo.World
AngularVelocity.Parent = Part
```

## Humanoid에 물리 적용

### LinearVelocity

```lua
local Attachment = Instance.new("Attachment")
Attachment.Parent = HumanoidRootPart

local LinearVelocity = Instance.new("LinearVelocity")
LinearVelocity.Attachment0 = Attachment
LinearVelocity.RelativeTo = Enum.ActuatorRelativeTo.World 
LinearVelocity.VectorVelocity = Vector3.new(0, 0, -500) 
LinearVelocity.MaxForce = 10
LinearVelocity.Parent = HumanoidRootPart	
```

### VectorForce

```lua
local Attachment = Instance.new("Attachment")
Attachment.Parent = HumanoidRootPart

local VectorForce = Instance.new("VectorForce")
VectorForce.Attachment0 = Attachment
VectorForce.RelativeTo = Enum.ActuatorRelativeTo.World
VectorForce.Force = Vector3.new(1000, 0, 0) 
VectorForce.Parent = HumanoidRootPart
```

### AngularVelocity

```lua
local Attachment = Instance.new("Attachment")
Attachment.Parent = HumanoidRootPart

local AngularVelocity= Instance.new("AngularVelocity")
AngularVelocity.Attachment0 = Attachment
AngularVelocity.RelativeTo = Enum.ActuatorRelativeTo.World
AngularVelocity.MaxTorque = 1000
AngularVelocity.AngularVelocity = Vector3.new(0, 10, 0) 
AngularVelocity.Parent = HumanoidRootPart
```

### ApplyImpulse

```lua
local LookVector = HumanoidRootPart.CFrame.LookVector
HumanoidRootPart:ApplyImpulse(LookVector * 100000)
```

### AssemblyLinearVelocity

```lua
local LookVector = HumanoidRootPart.CFrame.LookVector
HumanoidRootPart.AssemblyLinearVelocity = LookVector * 1500
```


---

# Agent Instructions: Querying This Documentation

If you need additional information that is not directly available in this page, you can query the documentation dynamically by asking a question.

Perform an HTTP GET request on the current page URL with the `ask` query parameter:

```
GET https://docs.overdare.com/korean/manual/studio-manual/object/physics.md?ask=<question>
```

The question should be specific, self-contained, and written in natural language.
The response will contain a direct answer to the question and relevant excerpts and sources from the documentation.

Use this mechanism when the answer is not explicitly present in the current page, you need clarification or additional context, or you want to retrieve related documentation sections.