> For the complete documentation index, see [llms.txt](https://docs.overdare.com/llms.txt). Markdown versions of documentation pages are available by appending `.md` to page URLs; this page is available as [Markdown](https://docs.overdare.com/manual/studio-manual/asset-and-resource-creation/skeletal-mesh-import.md).

# Skeletal Mesh Import

## Overview

Importing a skeletal mesh (an FBX file that contains a mesh, skeleton, and animation) into OVERDARE Studio automatically creates a character structure in the Level Browser that can play animations.

When you select a file, the Import Settings window opens, automatically analyzes the file, and displays errors/warnings in real time if any issues are found. After reviewing the analysis results, you can click the **Import** button to complete the import.

For how to import other assets—such as static meshes, textures, or audio—and their options, see the document below.

{% content-ref url="/pages/bS79pIBVkO3rjcUR9Zhi" %}
[Asset Import](/manual/studio-manual/asset-and-resource-creation/asset-import.md)
{% endcontent-ref %}

## Skeletal Mesh Import

### Opening the Import Settings Window

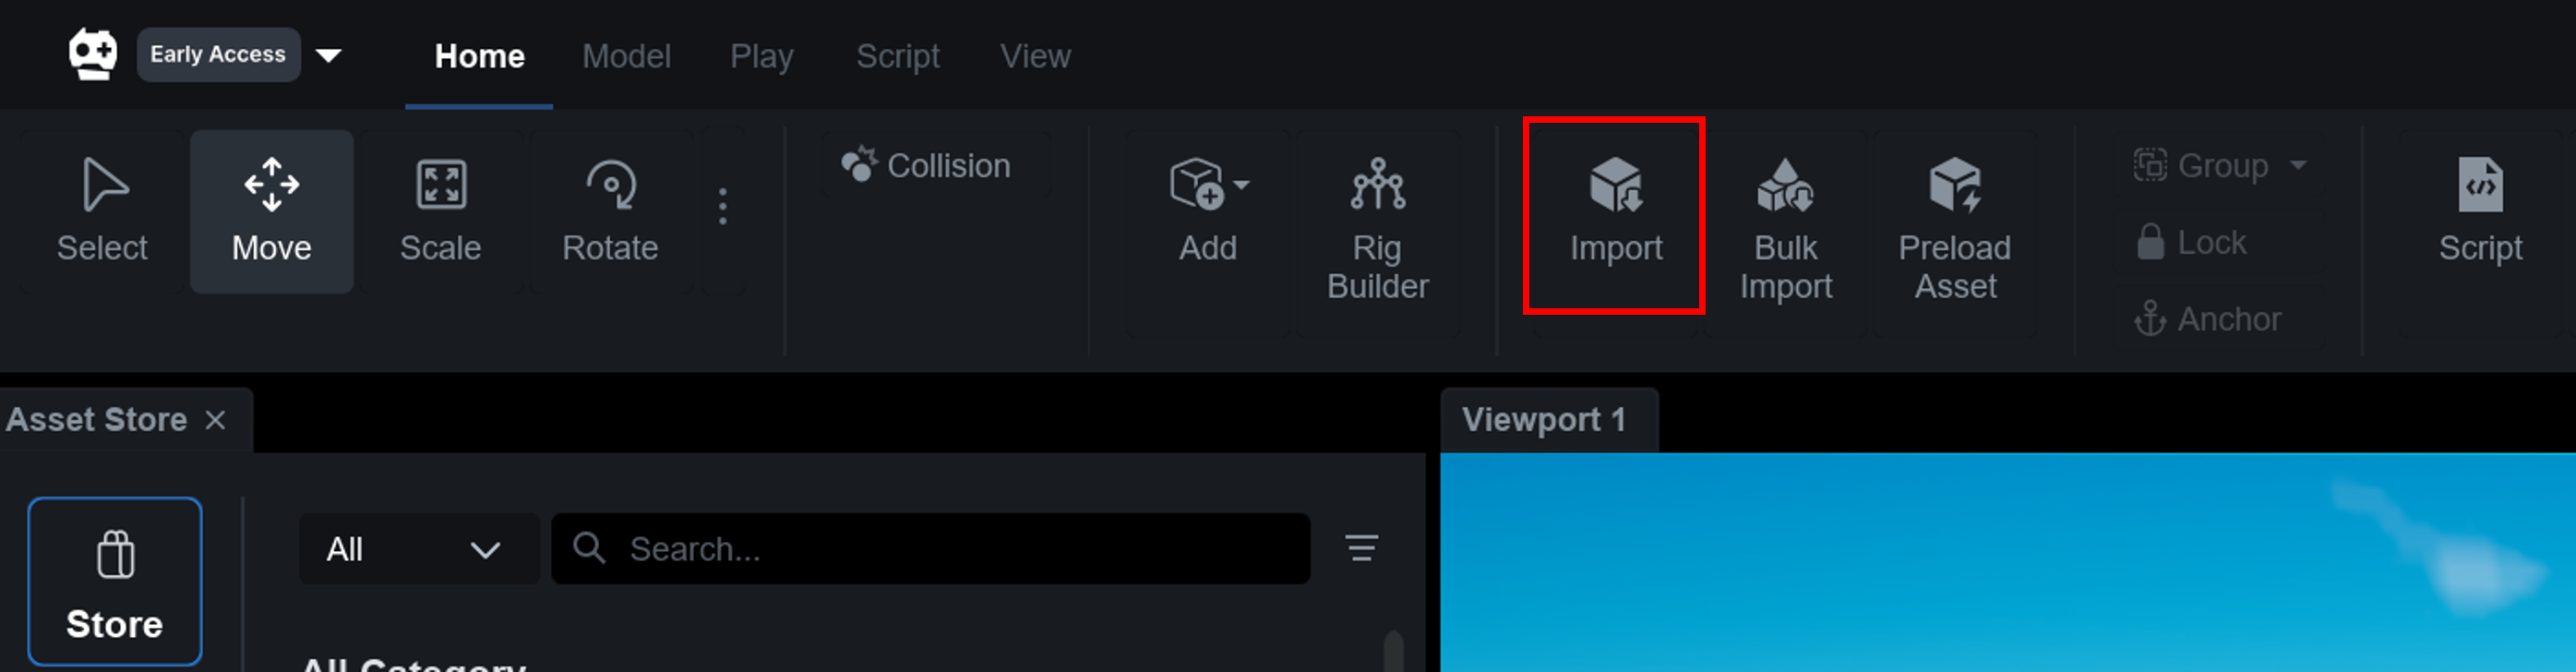
In the top tab area of OVERDARE Studio, select the Home tab, then click the Import button and select the FBX file you want to import.

<figure><img src="/files/C6n5QQrKyNPMFXYbrI3f" alt=""><figcaption></figcaption></figure>

If the selected FBX file contains a skeleton (i.e., it is a skeletal mesh), the Import Settings window opens automatically.

In beta, Import Settings can only import FBX files that meet all of the following conditions.

* The file must contain a mesh, skeleton, and animation.
* The mesh must be a single mesh. Files containing multiple meshes will produce an error and cannot be imported. Merge all meshes into one in an external tool and re-export the file.

Static meshes without a skeleton are imported through the existing mesh import options window.

### Layout

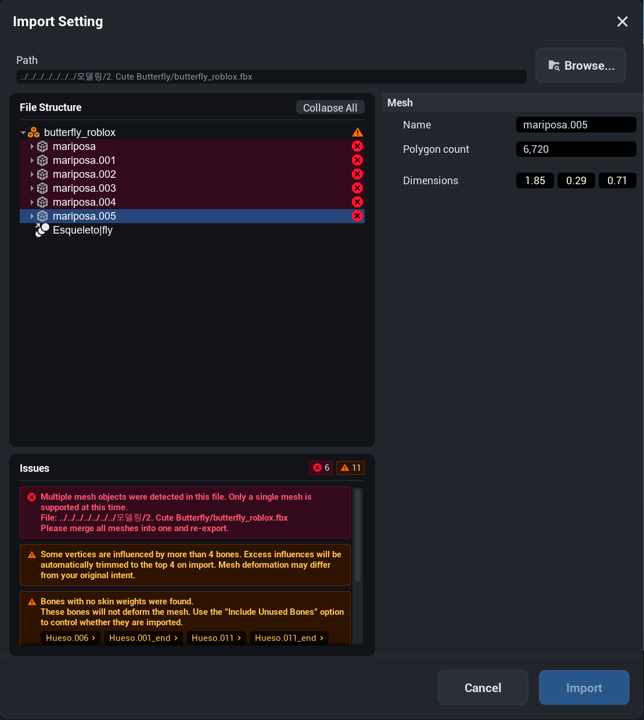
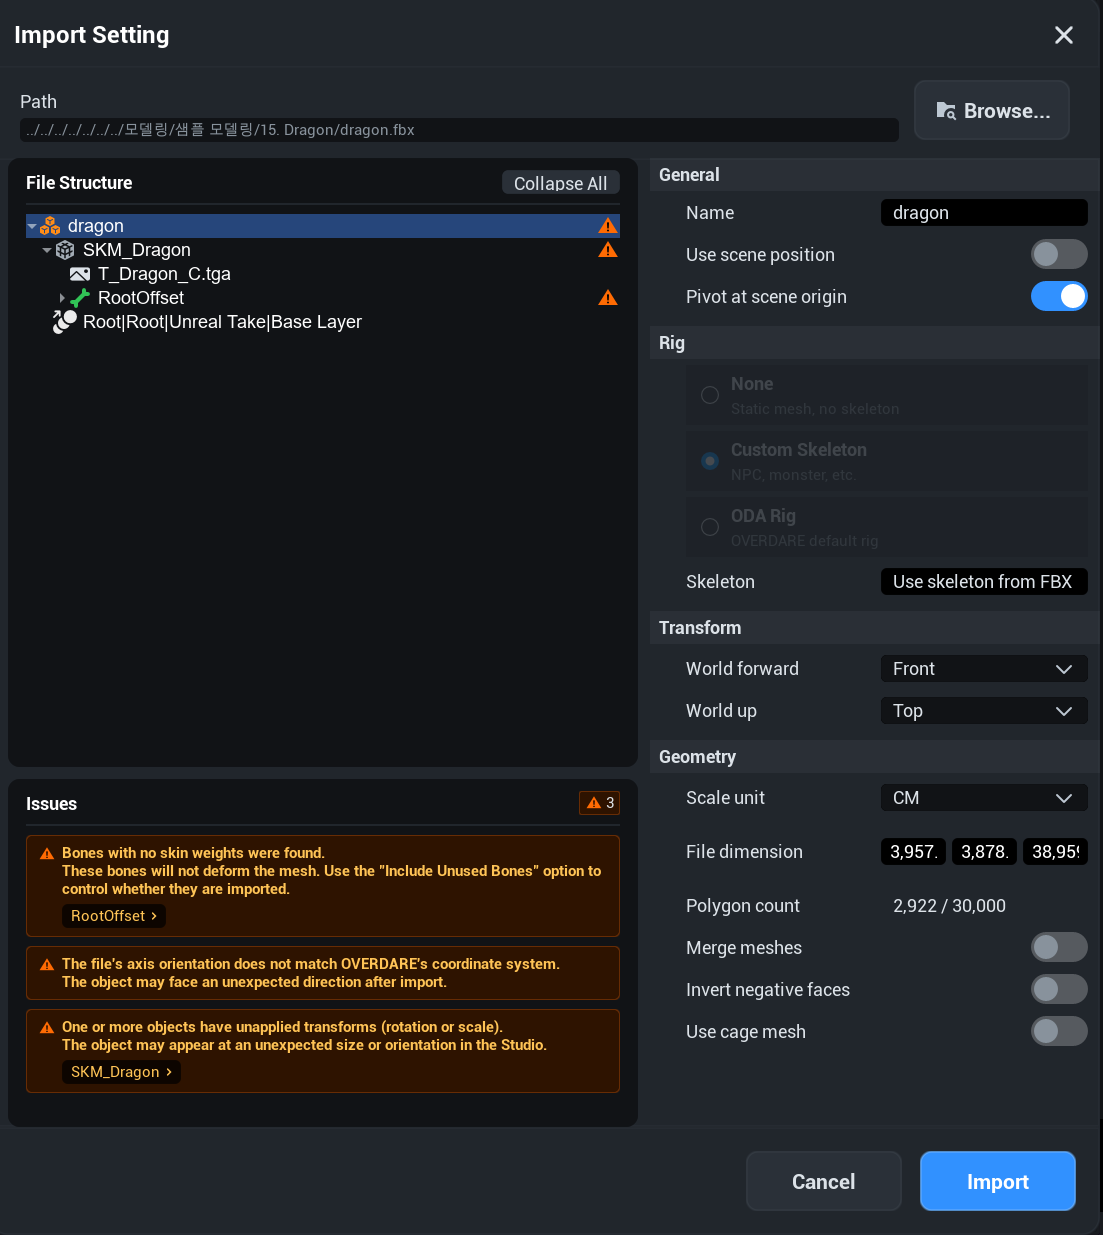
The Import Settings window consists of the following areas.

<figure><img src="/files/vGrn4BQLmlWR8ScevvzM" alt=""><figcaption></figcaption></figure>

<table><thead><tr><th width="200">Area</th><th>Description</th></tr></thead><tbody><tr><td>Top bar</td><td>Displays the path of the file being imported. You can select a different file using the Browse button.</td></tr><tr><td>File Structure</td><td>A tree view showing the elements contained in the file in a hierarchical structure. Selecting an item switches the option panel on the right to that item's settings. You can collapse the entire tree using the Collapse All button.</td></tr><tr><td>Issues</td><td>A list of errors/warnings found during file analysis. Always displayed at the bottom left.</td></tr><tr><td>Option panel</td><td>A settings panel whose content changes dynamically based on the item selected in the tree view. Options such as Rig Type and Skeleton are explained in detail in the Rig Type and Skeleton section below.</td></tr><tr><td>Bottom buttons</td><td>Contains the Cancel button and the Import button.</td></tr></tbody></table>

### File Structure (Hierarchy Tree View)

Displays the elements contained in the file (root model, mesh, texture, bones, animation clips, etc.) in a hierarchical structure. Element types are distinguished by icons.

* Clicking an item selects only that single item (single selection); the option panel on the right switches to that item's settings.
* By default, only the root level is expanded and child items are collapsed.

Currently, all elements contained in the file are imported together. Excluding individual elements from the import is not supported.

#### Issue Indicators

Problems found during file analysis are shown as icons on the corresponding item in the tree view.

<table><thead><tr><th width="145">Status</th><th>Display</th></tr></thead><tbody><tr><td>⚠️ Warning</td><td>A yellow warning icon is shown on the right side of the row.</td></tr><tr><td>🔴 Error</td><td>The entire row is displayed with a red background, and a red X icon is shown on the right side of the row.</td></tr></tbody></table>

If a node is collapsed and hides its child items, the parent node displays a single icon representing the most severe issue among its children.

### Rig Type and Skeleton

#### Rig Type Cards

Rig Type is displayed as a card-style UI. One of the three cards is automatically selected based on the file analysis, and in beta it cannot be changed manually.

<table><thead><tr><th width="180">Card</th><th width="240">Auto-Selection Condition</th><th>Description</th></tr></thead><tbody><tr><td>None</td><td>No bone structure in the file</td><td>Imported as a static mesh without bones. (Static mesh, no skeleton)</td></tr><tr><td>Custom Skeleton</td><td>A non-ODA bone structure is detected</td><td>A freely structured rig, such as for NPCs or monsters.</td></tr><tr><td>ODA Rig</td><td>An ODA bone structure is detected</td><td>OVERDARE's default character rig. Handled using the engine's built-in ODA skeleton.</td></tr></tbody></table>

#### Skeleton Field

The Skeleton field displays "Use skeleton from FBX" and uses the skeleton included in the imported FBX file as is. In beta, you cannot specify a different Skeleton asset.

#### ODA Rig Auto-Detection Criteria

The importer determines a file to have an ODA structure when it meets all of the following conditions.

<table><thead><tr><th width="180">Detection Item</th><th>Criteria</th></tr></thead><tbody><tr><td>Skin-influencing bone names</td><td>Must include all 16 of the following: LowerTorso, UpperTorso01, UpperTorso02, Head, LeftUpperArm, LeftLowerArm, LeftHand, RightUpperArm, RightLowerArm, RightHand, LeftUpperLeg, LeftLowerLeg, LeftFoot, RightUpperLeg, RightLowerLeg, RightFoot.</td></tr><tr><td>Control bone names</td><td>Must include at least one of the following: Root, IKHandRoot, IKHandGun, IKLeftHand, IKRightHand, IKFootRoot, IKLeftFoot, IKRightFoot, ThirdPersonCamera.</td></tr><tr><td>Bone hierarchy</td><td>LowerTorso must be the spine root and must be located under Root.</td></tr></tbody></table>

> If the above conditions are only partially met, the file is detected as Custom Skeleton. Since Rig Type cannot be changed manually, if you want to import it as ODA Rig, modify the bone structure in an external tool so that it meets all of the conditions above, then import the file again.

### Issues Panel

An area that is always fixed at the bottom left. It remains visible even when there are no issues.

#### Status Display

<table><thead><tr><th width="200">Status</th><th>Display</th></tr></thead><tbody><tr><td>✅ No issues</td><td>A message indicating there are no issues is displayed.</td></tr><tr><td>⚠️ Warnings only</td><td>A warning count badge is shown in the header, and the list of warning items is shown in the body.</td></tr><tr><td>🔴 Errors + warnings</td><td>Error count and warning count badges are shown side by side in the header; error items are listed first, followed by warning items, in the body.</td></tr></tbody></table>

<figure><img src="/files/lQJNn5lwbImojrdZgFWH" alt=""><figcaption></figcaption></figure>

Each issue item shows a description of the problem along with how to resolve it. Clicking the element name button shown in an issue item moves the focus to that item in the tree view. Conversely, clicking an item with an issue in the tree view also selects that item in the Issues panel.

> ⚠️ **Warnings** do not block the import. You can review the details and proceed with the import as is.\
> 🔴 **Errors** must be resolved before you can import.

#### Common Errors and Warnings

<table><thead><tr><th width="88">Type</th><th width="300">Message</th><th>Details and Resolution</th></tr></thead><tbody><tr><td>🔴 Error</td><td>Multiple mesh objects were detected in this file.</td><td>The file contains more than one mesh. Only a single mesh is currently supported, so merge all meshes into one in an external tool and re-export the file.</td></tr><tr><td>⚠️ Warning</td><td>Bones with no skin weights were found.</td><td>Bones with no skin weights were found. These bones do not deform the mesh. If they are unnecessary, remove them in an external tool and re-export the file.</td></tr><tr><td>⚠️ Warning</td><td>The file's axis orientation does not match OVERDARE's coordinate system.</td><td>The file's axis orientation does not match OVERDARE's coordinate system. The object may face an unexpected direction after import. Check the World forward / World up values in the option panel.</td></tr><tr><td>⚠️ Warning</td><td>One or more objects have unapplied transforms (rotation or scale).</td><td>One or more objects have unapplied rotation or scale transforms. The object's size or orientation may look different than expected after import, so apply the transforms in an external tool and re-export the file.</td></tr><tr><td>⚠️ Warning</td><td>Some vertices are influenced by more than 4 bones.</td><td>Some vertices are influenced by more than 4 bones. On import, only the top 4 most influential bones are kept automatically, so the mesh deformation may differ from the original.</td></tr></tbody></table>

### Automatic Detection and Real-Time Validation

When the Import Settings window opens, it automatically analyzes the file and sets the main options. Changes to options are re-validated in real time.

<table><thead><tr><th width="240">Detection Item</th><th>Automatic Handling</th></tr></thead><tbody><tr><td>Bone structure</td><td>Automatically sets the Rig Type. (None / Custom Skeleton / ODA Rig)</td></tr><tr><td>Animation data</td><td>Displays the list of animation clips in the tree view.</td></tr><tr><td>Non-triangulated polygons</td><td>Shows a warning and automatically triangulates them.</td></tr><tr><td>Bone skin weights/influence count</td><td>Detects bones with no skin weights, vertices influenced by more than 4 bones, and so on, and shows a warning.</td></tr><tr><td>Axis orientation/transform</td><td>Detects coordinate system mismatches and unapplied transforms (rotation/scale), and shows a warning.</td></tr><tr><td>Joint naming rule violations</td><td>Shows an error on the corresponding item in the tree view and provides a suggested fix.</td></tr></tbody></table>

## Level Browser Placement

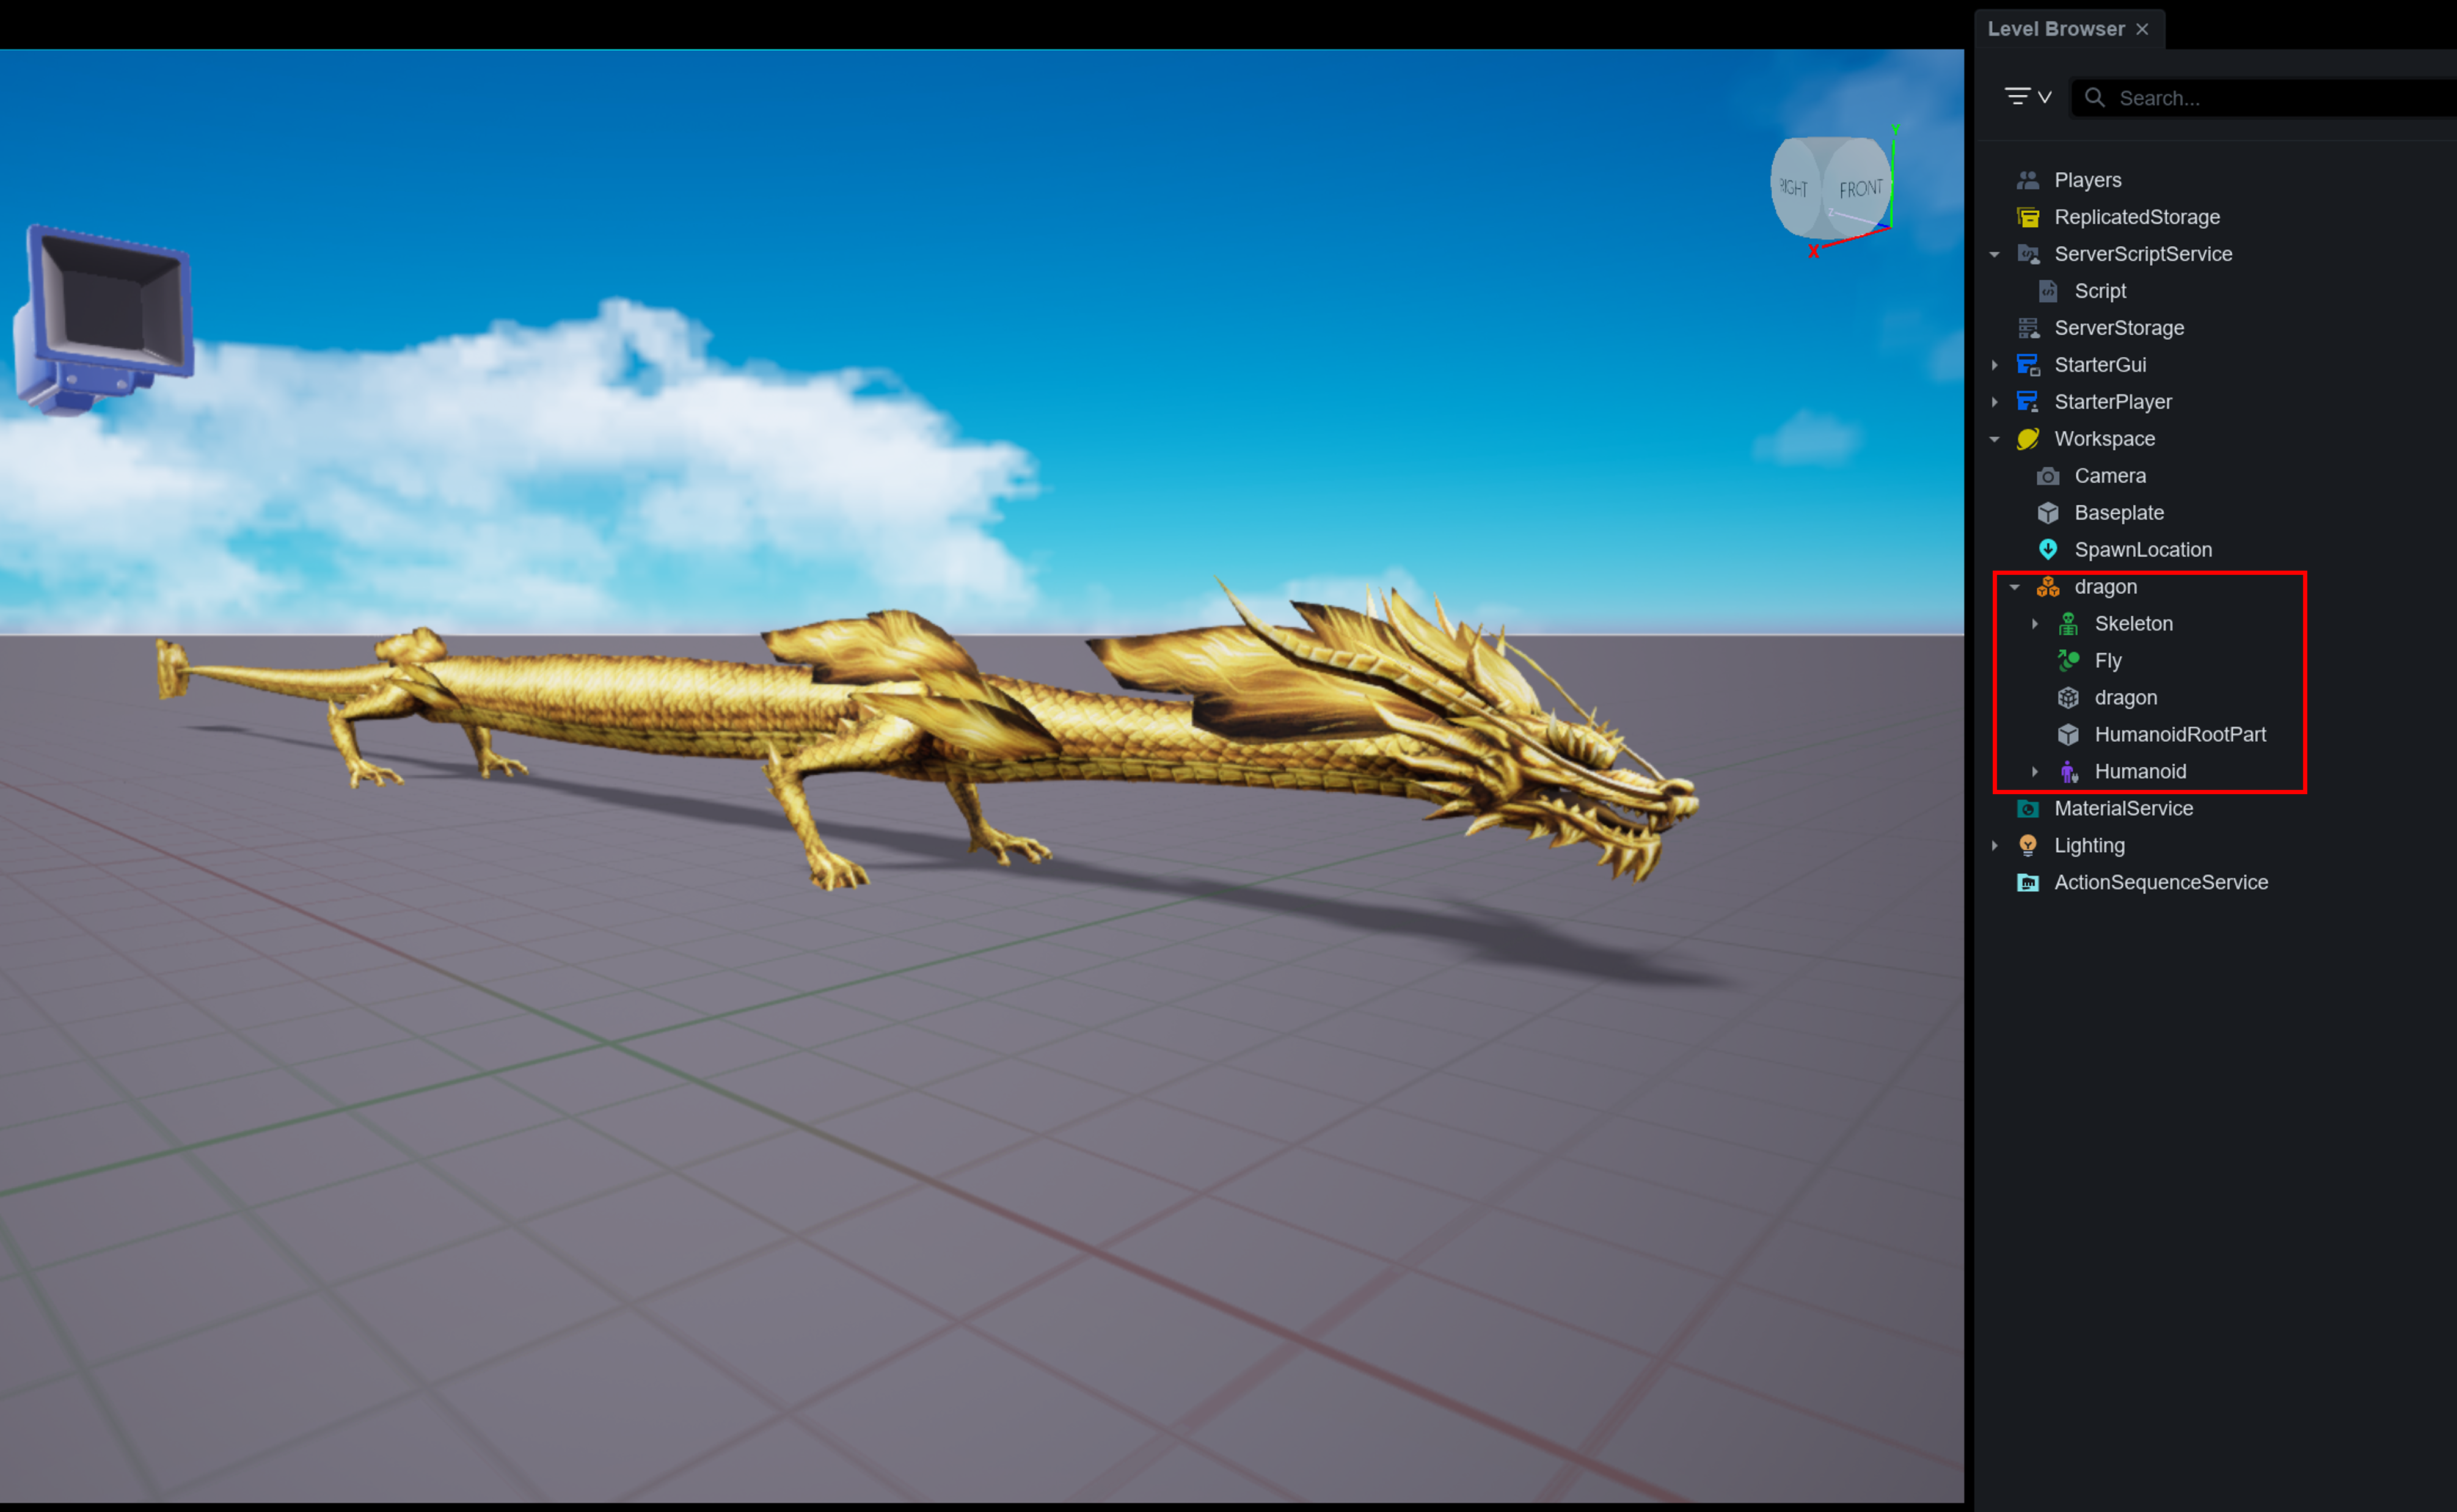
When you import a skeletal mesh with Import Settings, a character structure that can play animations is automatically created in the Level Browser.

<figure><img src="/files/IY7GiYEA2wGsP73zErPG" alt=""><figcaption></figcaption></figure>

<table><thead><tr><th width="200">Sub-Object</th><th>Description</th></tr></thead><tbody><tr><td>Skeleton</td><td>The imported skeleton.</td></tr><tr><td>Animation clip</td><td>The animation clip included in the file. (e.g., Fly)</td></tr><tr><td>Mesh</td><td>The mesh responsible for the character's visual appearance. (e.g., dragon)</td></tr><tr><td>HumanoidRootPart</td><td>The root part responsible for the character's movement and physics.</td></tr><tr><td>Humanoid</td><td>The Humanoid object that controls the character's state and animation.</td></tr></tbody></table>

This structure behaves the same as an existing Humanoid-based character. This means you can use existing APIs that rely on Humanoid and HumanoidRootPart (movement, animation playback, etc.) as-is.

## Usage Example

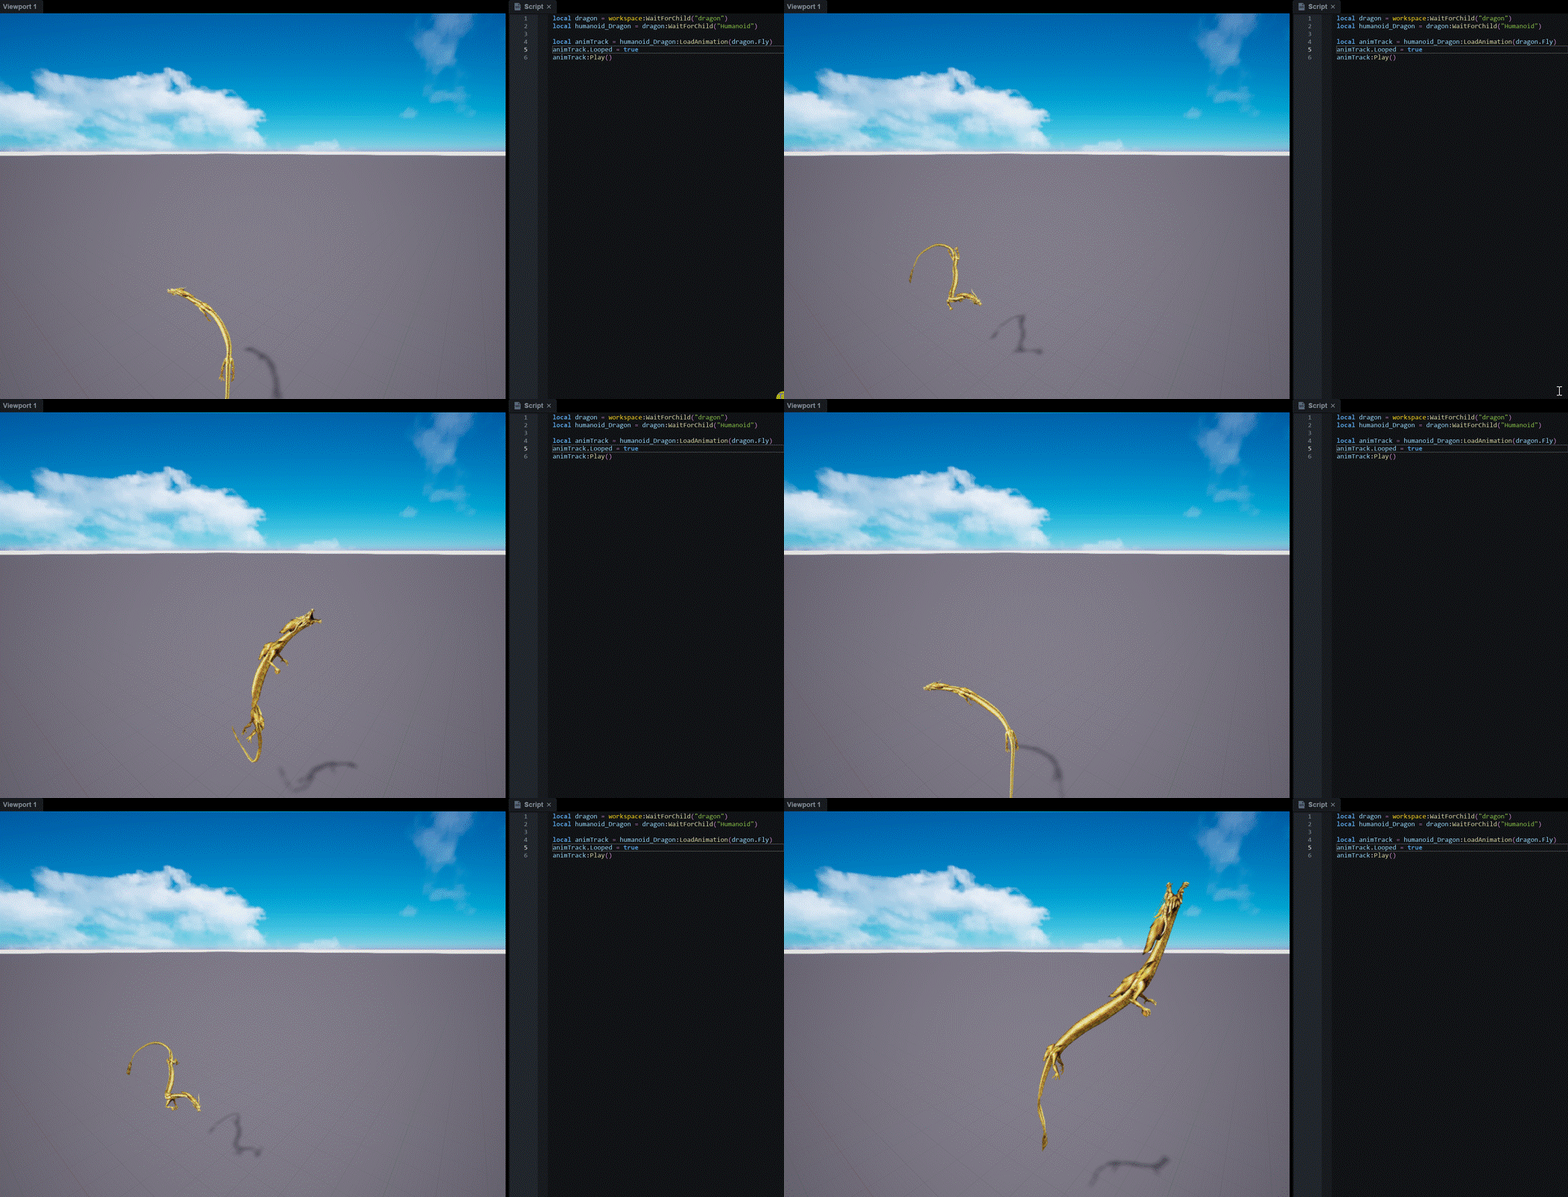
Imported animation clips can be played through the Humanoid's Animator, the same way as existing character animations.

<figure><img src="/files/Zuhzb0B7n4pAzEfWyLLr" alt=""><figcaption></figcaption></figure>

## Notes

* Currently, only a single mesh is supported in beta. If a file contains multiple meshes, merge them into one in an external tool and re-export the file.
* If errors (🔴) remain, the Import button is disabled and the file cannot be imported. Refer to the resolutions shown in the Issues panel, fix the file in an external tool, and import it again.
* The maximum importable polygon count is 30,000. You can check the current polygon count and limit in the Polygon count field of the option panel.
* If a bone (joint) name does not follow the naming rules (for example, if it contains non-Latin characters), it may be flagged as an error. Bone names cannot be changed in Studio, so you must edit them in an external tool such as Blender.
* Import Settings is a beta feature, and its UI and behavior may change in future updates.