> For the complete documentation index, see [llms.txt](https://docs.overdare.com/llms.txt). Markdown versions of documentation pages are available by appending `.md` to page URLs; this page is available as [Markdown](https://docs.overdare.com/manual/studio-manual/asset-and-resource-creation/asset-store.md).

# Asset Upload / Download

## Overview

You can upload objects configured in the Level Browser and **register them as assets in the Asset Store.** Registered assets can be shared with other creators, contributing to the expansion of the OVERDARE creator ecosystem.

Assets you upload or import are registered in the **MY ASSETS tab** of the Asset Store. Assets intended for personal use can remain private, and you can make them available to other creators in the Asset Store when needed.

## Features

A single functional system is typically distributed across multiple services such as Workspace, StarterGui, ServerScriptService, and StarterPlayer.

With the Multi Upload feature, these distributed objects can be **consolidated into a single asset** without manually relocating them. The **parent hierarchy structure and positional data at the time of upload are preserved**. When downloaded, each object is automatically placed under its corresponding service based on the saved structure.

This allows complex functional systems—such as Inventory, CheckPoint, or CombatSystem—to be **distributed and reused without structural loss**.

## Upload Types

<table><thead><tr><th width="137">Category</th><th width="354">Description</th><th>Example</th></tr></thead><tbody><tr><td><strong>Single Upload</strong></td><td><p>Uploads only <strong>one selected object (including its descendants).</strong><br></p><p>The <strong>top-level parent hierarchy information</strong> of the selected object is saved together.</p></td><td><p><strong>Asset 1</strong></p><ul><li>Workspace.Part</li></ul><p><strong>Asset 2</strong></p><ul><li>StarterGui.PlayerHUD</li></ul></td></tr><tr><td><strong>Multi Upload</strong></td><td><p>Uploads <strong>multiple selected</strong> objects at once (including objects under the same parent or different parent hierarchies).<br></p><p>The <strong>top-level parent hierarchy information and positional data</strong> of each selected object are saved together.</p></td><td><p><strong>Asset 3</strong></p><ul><li><p>ServerScriptService</p><ul><li>CheckPointManager</li></ul></li><li><p>StarterGui</p><ul><li>CheckPointUI</li></ul></li><li><p>Workspace</p><ul><li>CheckPoint1</li><li>CheckPoint2</li></ul></li></ul></td></tr></tbody></table>

## How to Use

In the Level Browser, **select** the object you want to upload, **right-click** it, and click **Save to OVERDARE** to upload the selected object to the Asset Store.

<figure><img src="https://2064130887-files.gitbook.io/~/files/v0/b/gitbook-x-prod.appspot.com/o/spaces%2FhrvYlLq1mQAq0V0vwPsb%2Fuploads%2FBccXlmbicx0ctyC3Nu7m%2Fimage.png?alt=media&amp;token=b73b1979-f6a3-4a5e-8b8d-bb43bba295be" alt=""><figcaption></figcaption></figure>

### Single Upload

1. Select a **single object** in the Level Browser and run Save to OVERDARE.
2. In the upload type selection popup, choose **Single Upload**.

   <div align="left"><figure><img src="https://2064130887-files.gitbook.io/~/files/v0/b/gitbook-x-prod.appspot.com/o/spaces%2FhrvYlLq1mQAq0V0vwPsb%2Fuploads%2FsbYYhVPLc6pygswP6HVB%2Fimage.png?alt=media&amp;token=46f37115-3e80-4d9a-9f86-64a376e968be" alt="" width="563"><figcaption></figcaption></figure></div>

When using Single Upload, the **top-level parent hierarchy information** of the selected object is saved together.

For example, if you upload ShopUI under StarterGui, the StarterGui hierarchy information is also saved. When downloaded, it will be automatically inserted under the StarterGui.ShopUI path.

<div align="left"><figure><img src="https://2064130887-files.gitbook.io/~/files/v0/b/gitbook-x-prod.appspot.com/o/spaces%2FhrvYlLq1mQAq0V0vwPsb%2Fuploads%2F2nJHygAHSSsKRZlpesMF%2Fimage.png?alt=media&amp;token=22152b45-cd1e-4a69-952f-0cff6876913a" alt=""><figcaption></figcaption></figure></div>

### Multi Upload

1. **Select multiple** objects in the Level Browser and run Save to OVERDARE.\
   (A Multi Upload popup appears automatically when multiple objects are selected.)

   <figure><img src="https://2064130887-files.gitbook.io/~/files/v0/b/gitbook-x-prod.appspot.com/o/spaces%2FhrvYlLq1mQAq0V0vwPsb%2Fuploads%2FCqa1viDp1icL1m2aGaEZ%2Fimage.png?alt=media&amp;token=2d9cb0df-e71f-40ed-82d1-1c742c6f02f7" alt=""><figcaption></figcaption></figure>
2. While the Multi Upload popup is open, **clicking objects in the Level Browser** immediately updates their inclusion status.

   <figure><img src="https://2064130887-files.gitbook.io/~/files/v0/b/gitbook-x-prod.appspot.com/o/spaces%2FhrvYlLq1mQAq0V0vwPsb%2Fuploads%2FnoD2y8TTq1YmpKwS8IiS%2Fimage.png?alt=media&amp;token=33d02db2-d5b4-42f8-85aa-924d86822b58" alt=""><figcaption></figcaption></figure>

   1. Clicking an unselected object adds it to the upload list.
   2. Clicking a selected object removes it from the upload list.
3. After reviewing the object structure displayed in the popup, click the **Upload button.**

When using Multi Upload, the **top-level parent hierarchy information and positional data** of each selected object are saved together.

For example, if you multi-upload an item spawn system composed of multiple spawners, the position of each spawner is saved. When downloaded, each spawner is automatically placed at its saved position.

## MY ASSETS Registration and Management

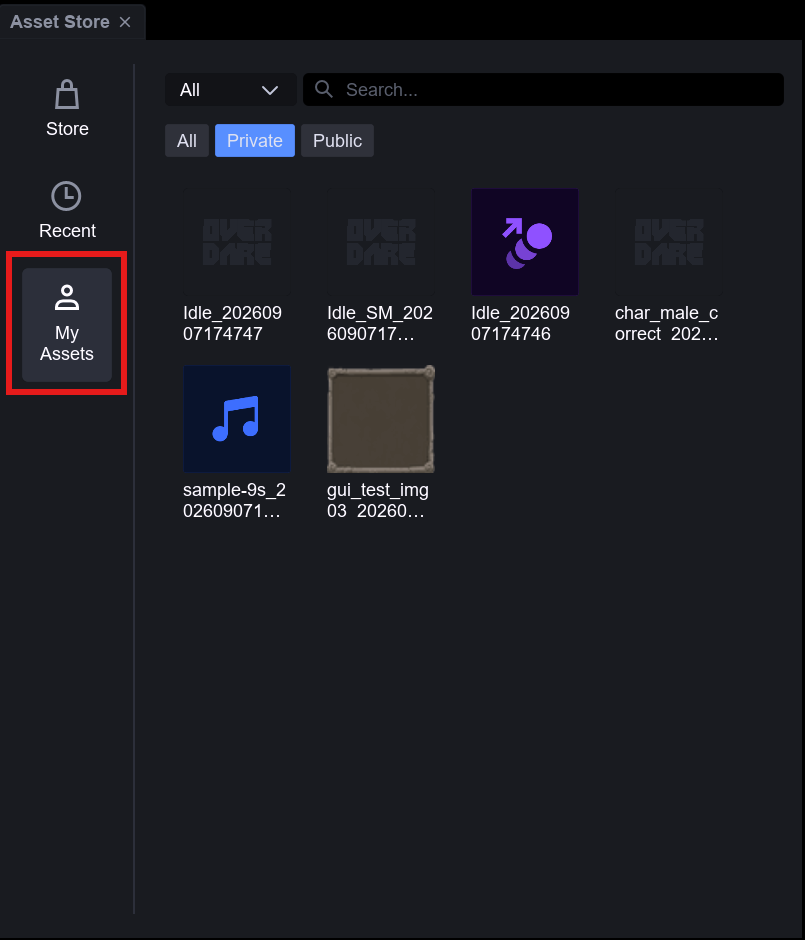
You can view and manage assets you have registered in the **MY ASSETS tab** of the Asset Store panel. MY ASSETS displays all of your registered assets, whether they are private or public.

### Registering Private Assets

You can register assets for personal use as private assets in MY ASSETS in the following ways.

1. **Save an object from the Level Browser**\
   During a Single or Multi Upload, disable the **Distribute on Asset Store option** on the web page that opens. The asset will remain private and be registered in MY ASSETS.

   <figure><img src="https://2064130887-files.gitbook.io/~/files/v0/b/gitbook-x-prod.appspot.com/o/spaces%2FhrvYlLq1mQAq0V0vwPsb%2Fuploads%2FH0zorAVShPRcIzNhaPQX%2Fimage.png?alt=media&amp;token=8e6f983a-0d3e-4e98-b2e1-7bfb5a363235" alt=""><figcaption></figcaption></figure>
2. **Import an asset**\
   When you import an asset, it is registered in MY ASSETS automatically without a separate upload process. Imported assets are private by default and can be used only by you.

MY ASSETS is displayed based on your account, so the same list appears regardless of the world currently open. An asset imported in one world can be used in another world without importing it again.

<figure><img src="https://2064130887-files.gitbook.io/~/files/v0/b/gitbook-x-prod.appspot.com/o/spaces%2FhrvYlLq1mQAq0V0vwPsb%2Fuploads%2Fgit-blob-2db718170aa1393e7ba34af5466d1a3bb861d386%2Fmy-assets-tab.png?alt=media" alt=""><figcaption></figcaption></figure>

### Making Assets Public

You can start the process of making an asset public from any of the following three locations. Each method opens the same web page for configuring the asset's public settings.

| Starting location | How to open the public settings page                  | Applies to                                     |
| ----------------- | ----------------------------------------------------- | ---------------------------------------------- |
| **Level Browser** | Right-click an object and click **Save to OVERDARE**. | An object you are uploading for the first time |
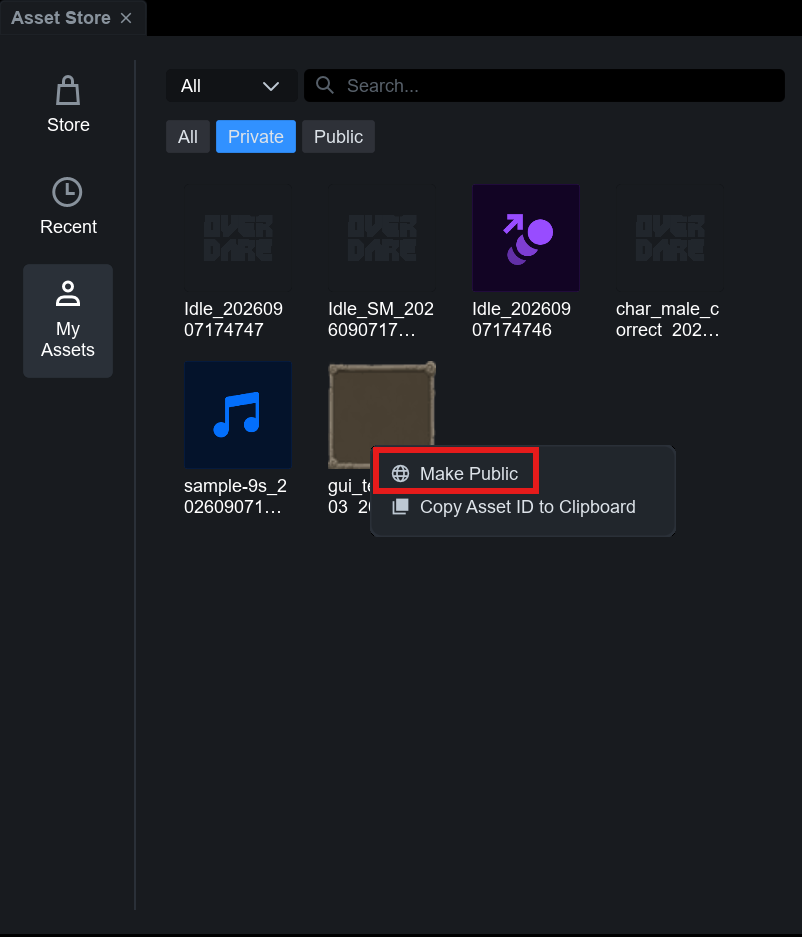
| **MY ASSETS**     | Right-click an asset and click **Make Public**.       | A private asset registered in MY ASSETS        |
| **Asset Manager** | Right-click an asset and click **Make Public**.       | An asset managed in Asset Manager              |

For example, you can select **Make Public** in MY ASSETS as shown below.

<figure><img src="https://2064130887-files.gitbook.io/~/files/v0/b/gitbook-x-prod.appspot.com/o/spaces%2FhrvYlLq1mQAq0V0vwPsb%2Fuploads%2Fgit-blob-19b0037505fef06deff610b871b54cbbc1c6d975%2Fmy-assets-make-public.png?alt=media" alt=""><figcaption></figcaption></figure>

When the web page opens, follow these common steps to make the asset public.

1. Enter the asset name, category, and tags.
2. Enable the **Distribute on Asset Store option**.
3. Save the settings.

For an imported asset, the name field is pre-filled with a name generated from the file name and import time. You can change it to any name you want.

An asset that has been made public is not removed from MY ASSETS. The badge on the asset card changes from PRIVATE to PUBLIC, and the asset also appears in the **Store tab.**

If you save without enabling the **Distribute on Asset Store option**, only the information you entered is saved and the asset remains private. If you reopen the public settings page from any of the three locations above, the saved information appears again.

{% hint style="warning" %}
An asset that has been made public cannot be made private again, and a registered asset cannot be deleted. Checking the asset before making it public is recommended.
{% endhint %}

## Download

In the Asset Store panel, you can browse and use public assets in the **Store tab**.

You can view and use assets you have registered in the **MY ASSETS tab**.